A cake smash photo shoot is an incredibly fun way to mark your baby’s first birthday. It’s fun to do a cake smash BEFORE the birthday party so you can focus on getting good pictures of your baby enjoying his first bite of cake without worrying about neglecting your guests.
And you can let him make all the mess he wants and then get it all cleaned up before the party takes place. Sure, he can have more cake at the party, but if you know you already have great photos, you won’t be so worried about getting the perfect shot during the party. These photos are also great for social media, where you’re guaranteed to get Facebook likes for whatever you share.
PLEASE NOTE: YOU MUST ENSURE YOUR CHILD’S SAFETY. For example, any time you are taking pictures of a baby, you MUST have another adult that acts as a spotter and stands near the baby at all times. Additionally, any “backdrop” should be secured so it won’t fall over. Remember that safety is more important than any photo, and you are responsible for your child’s safety.
DIY CAKE SMASH PHOTOSHOOT
Here’s what you need to set up your own cake smash photoshoot:
Background
The background for a cake smash photo shoot can be as simple as a solid colored wall or sheet taped up to a wall, but having a solid color background and matching solid color floor looks more professional. Pros generally use seamless paper, which makes for a very professional solid color look that blends from the background down onto the floor. I wanted a similar look for a lot less money, so this is the solution I came up with. I start with one of my DIY photo backdrop boards, propped against the backs of two kitchen chairs. Then I cover the board with a white table cloth (pressed or steamed to remove wrinkles). I use clamps to hold the tablecloth at the top of the board, then let the tablecloth drape down the board and onto the floor. I then lay a piece of plexiglass over the tablecloth that is on the floor.
Using plexiglass on the floor is not necessary; however it helps to anchor the tablecloth and makes sure it doesn’t wrinkle up as the child sitting on it moves around. It also gives a nice little reflective effect. I think clear vinyl would serve the same purpose (as long as you use something heavy on the corners to hold it in place). Clear vinyl is very cheap – you can get it in the fabric section of Walmart. Whatever you decide to use, the most important part is using a solid colored piece of fabric that’s large enough to drape down behind the baby and also cover the floor under the baby – and do everything you can to smooth out wrinkles.
Props
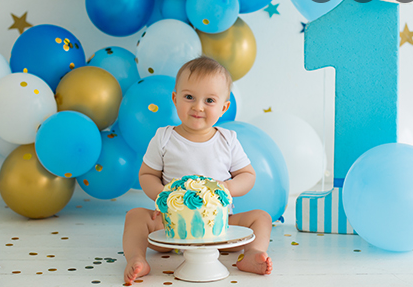
Decide on a color scheme for your cake smash photoshoot, and then gather your props. Balloons look fantastic in the background of photos, and are easy to find in just about any color. Cut triangles from scrapbook paper and string them together to make a banner (or just put masking tape on the back of each one and tape them directly to your background). A birthday hat (buy one that matches or make one from coordinating fabric) completes the scene.
Cake
You could buy a cake from a bakery, but it’s fairly simple to make your own in round pans and spend a little time decorating it. Two cake tips: First, make a chocolate cake! The dark colored cake shows up much better in photographs and looks much cuter as it gets strewn around. Second, buy at least 3 cans of frosting, so you have plenty to tint different colors. I normally make frosting, not buy it, but for a cake smash photoshoot I’m more concerned about looks than taste, and store-bought frosting cuts down on prep time.
Once your scene is set, get out your camera and take a few test shots. I recommend switching to portrait setting on your camera, or if you have some experience shooting on other modes choose AV and pick a fairly low aperture number (maybe 2.8 or 3.2). Be sure to set up with the baby facing a large window during midday when there’s plenty of light coming in (but not when you can see a bright window-shaped patch on the floor in front of your window – more on window light). You will not be happy with your photoshoot if there isn’t enough light and you have to use your flash.
Then put the baby down and start shooting! Since the baby will be on the floor, you’ll need to be on the floor as well so you can shoot from about her eye level. Sit in front of her (probably just below the large window in the room that she’s facing) and snap away to get cake smash photos.
Make sure to get a shot of the very first handful of cake and the very first bite.
Take some full-length pictures that show all the props, then zoom in for a closer shot.
Then zoom in even more.
You want a variety of shots for your DIY cake smash. So as well as full body shots, take some detailed photos, like a picture of baby’s hands digging into the cake.And another shot of the chubby legs and toes all covered in frosting.
Keep shooting as long as the baby is still having fun. Take photo after photo – you can delete some later – but taking lots of pictures will ensure you don’t miss the smiles or the time she offers you a taste. Try a few different angles. Stand up and shoot from above.
Or lay all the way down on the ground to shoot from cake-level.
Just be sure to get another full-length shot to document the all the cake smash mess.
And maybe one last shot of the demolished cake.
Good luck! Hope you have a great time with your DIY cake smash photoshoot.
click here for more articles.